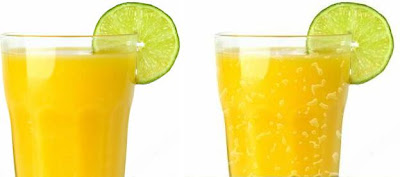
It might seem a little hard, but it really is not... Here's how it's done...
1. Start by making new surface, and then make new layer. Color this layer into white (by clicking on it in layer panel, and pressing Alt+Backspace, if white is your secondary color). Here's what you should get:

2. After that, from menu bar select "Noise -> Add Noise", and add maximum amount of noise (400%). Use picture bellow to see if you are doing it right...

3. Now, you should go to "Effect -> Blur -> Gaussian Blur", and adjust radius to approx 5.

4. Now go to "Image -> Adjustment -> Treshold", and draw the pointer until you get somewhat of black drops on your picture.

5. Use "Magic Wand" tool to select white background of the picture, and then press Delete to delete white background. Now, press Shift+Ctrl+I to invert selection.

6. Now, by selecting one shade of gray in color box, press Alt+Backspace to color the drops...

7. Deselect the selection (with Ctrl+D). Now, go to "Layer -> Layer Style -> Bevel and Emboss", and then input values as shown on picture (or improvise around them):

8. Now, go to "Layer -> Layer Style -> Stroke", and also input values as follows, or something around them...

9. Again, select drops by selecting the drops Layer, and pressing Ctrl+E, to make two layer into one. Now,

10. At the end, your water drops sample should look something like this:

11. Now, open the picture on which you want to add water drops (in this case it is glass of juice), and, if it is needed (if drops sample is too big for the picture) resize the water drops image to fit the glass.

12. Now, drag and drop the "Water Drops Layer" to your "Glass picture", and then go to Blending options of the layer, and set the values as follows (note that blend mode is set to Hard Light!):

13. When finished, after maybe few adjustments of the position of drops, i got my wet glass of juice!

That is it!
2 comments:
u r a bluffer
thanks for that information.. it helps me a lot.. ^_^
Post a Comment