A ten-minute crash course in Blender 3D
Saturday, June 30, 2007
- 3D Studio Max - Simple Clothes Animation
We'r gonna look on how to make clothes in 3Ds max.
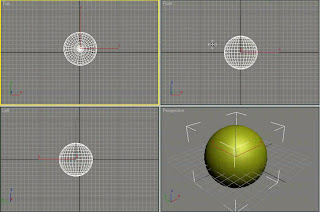
1. Create sphere in a top veiw.
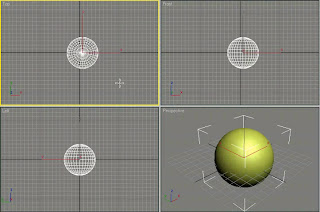
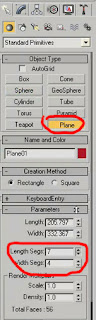
2. And then create a plane on top of that.
also, bump up the lenght and the width segments a little bit.
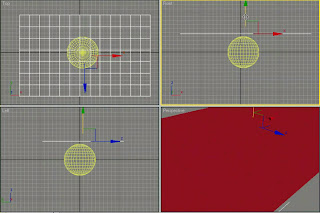
3. Move this on frony view so it's on top of our sphere.
4. Now we'r going to set up the clothe simulation.
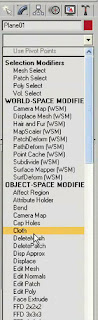
Got to the modifier tab, and add the clothe modifier to the plane.
(We want the plane we've just made to be our clothe. In order to do that, we will have to apply clothe modifier to both objects...)
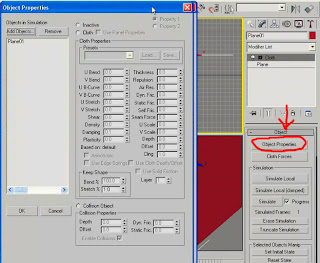
Now, select "object properties"
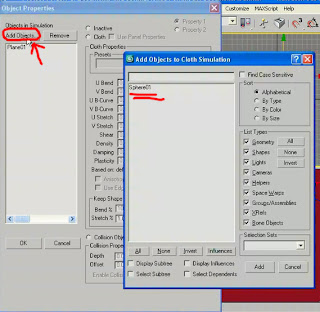
and, there, select "add objects", and double click the "Sphere01", to make it part of you'r simulation.
5. Both of these object are Inactive by default, so we will do following:
click the Plane, and select the cloth (as we want it to be cloth)
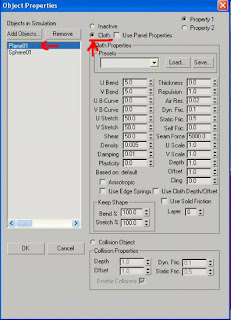
for the Sphere we want it to be "colision object", so select that,
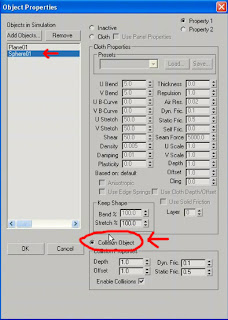 and click OK...
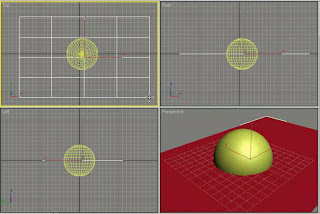
6. Maximase the perspective viewport, and check if all things are the way you want it...
When you are sure they are, click "Simulate Local" to view you'r simulation...
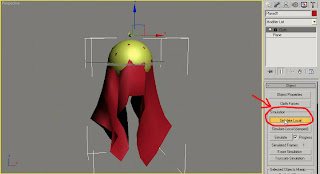
And, there it is!
It's just that easy!
1. Create sphere in a top veiw.

2. And then create a plane on top of that.

also, bump up the lenght and the width segments a little bit.

3. Move this on frony view so it's on top of our sphere.

4. Now we'r going to set up the clothe simulation.
Got to the modifier tab, and add the clothe modifier to the plane.
(We want the plane we've just made to be our clothe. In order to do that, we will have to apply clothe modifier to both objects...)

Now, select "object properties"

and, there, select "add objects", and double click the "Sphere01", to make it part of you'r simulation.

5. Both of these object are Inactive by default, so we will do following:
click the Plane, and select the cloth (as we want it to be cloth)

for the Sphere we want it to be "colision object", so select that,
 and click OK...
6. Maximase the perspective viewport, and check if all things are the way you want it...
When you are sure they are, click "Simulate Local" to view you'r simulation...

And, there it is!
It's just that easy!
- 3D Studio Max - Animating Bulding Demolition
In this video you will learn how to (1)convert building mesh to particles with Cebas thinkingparticles (2)create dust and smoke with Superspray plus AfterBurn 3.0 (3)Create debris with Particle Flow. You need: 3ds max 7, Cebas Thinkingparticles, AfterBurn plugins to make this effect.
Part 1:
Part 2:
Part 1:
Part 2:
- Maya - Mysique (X-Men) - Sampler Deformer
Tutorial on how Stroika's sampler deformer was used to create the Mystique transformation effect in the X-Men movie series.
- 3D Studio Max - Creating Hair
An easy way to make hair in 3Ds MAX!
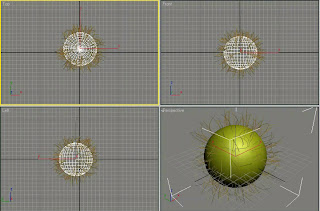
1. First, make a sphere in a top view
2. Go down to the modifer tab, and scroll down on the modifier list, and select "hair & fur"
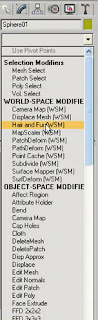
3. By doing that you should get some hair and fur onto your sphere.
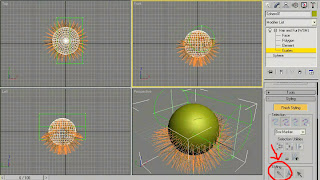
4. Open it up, and select faces, and hit Ctrl+A to select all
5. Click on style hair, and you'll get you'r little cursore (which is in fact the digital brush).
What you will do is grab it, and start colming the hair untill you get the look you want...
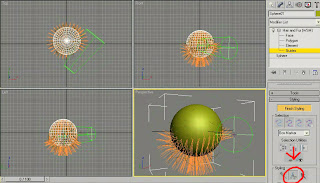
6. You can also grab scissors, and cut off and trim the hair...
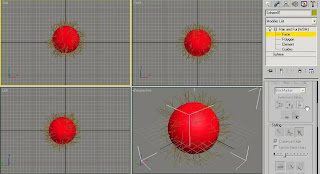
7. Select perspective view port, and hit F9 to render, and...
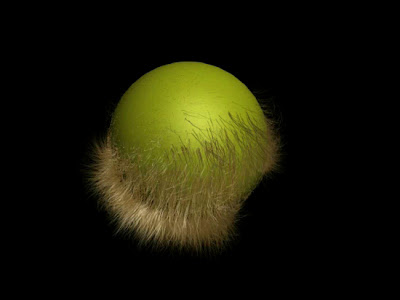
Voila...
How easy it is!
1. First, make a sphere in a top view

2. Go down to the modifer tab, and scroll down on the modifier list, and select "hair & fur"

3. By doing that you should get some hair and fur onto your sphere.

4. Open it up, and select faces, and hit Ctrl+A to select all

5. Click on style hair, and you'll get you'r little cursore (which is in fact the digital brush).
What you will do is grab it, and start colming the hair untill you get the look you want...

6. You can also grab scissors, and cut off and trim the hair...

7. Select perspective view port, and hit F9 to render, and...

Voila...
How easy it is!
Monday, June 11, 2007
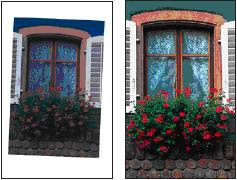
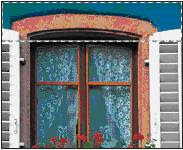
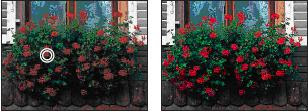
- Photoshop - Window & Flowers - Basic Photography Corrections and Retouching
This step-by-step lesson will provide you with basics in photography correction by showing you how to use whole range of elementary tools for this job.
Start by opening the desired picture.
1. (Note the change we will make to example picture:)
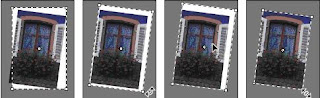
2. After you open the picture, from the toolbox select crop tool, and then in tool options bar type dimensions. Mark the picture, and then make sure the edges of the marker match edges of the picture. Then press Enter:
3. Select option Image/Adjustments/Levels, and you will get this window:
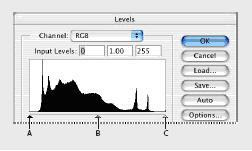
by moving one of three triangles, you adjust shadows, brighter, and darker tones..
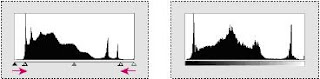
when you are satisfied with values (in my case, input level values are: 18, 1.30, 232) click OK and save the picture.
4. You can also adjust auto contrast authomaticly, by using option Image/Adjustment/Auto Contrast. In this example, we wont use that.
5. Change the colors on Picture. Select rectangular marquee tool and select desired area. Select option Image/Adjustments/Replace Color.
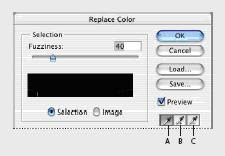
Select the first dropper tool, and click on any point on the color you want to replace. Now, click on middle eyedropper tool, and draw across other areas of the desired color, untill the whole selection in dialogue becomes white.
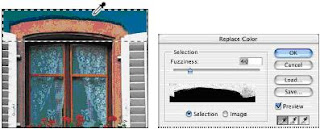
Adjust tolerance level to 80. By this, you adjust degree by which the connected colours will be included in mask. Click OK
6. Adjusting the light using dodge tool. Select dodge tool from toolbox. Input parameters as you wish. You have brush thickness, Range, and exposure.

Draw across desired object (curtains in this case), to sharpen them

7. Adjusting clearance by selecting sponge tool (behind dodge tool).
draw back and forth to brighten and make the color more clear.
8. We will end this lesson by using Unsharp Mask filter, that creates the ilusion of more focused picture. Select it from Filter/Sharpen/Unsharp mask.
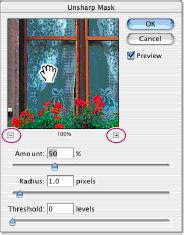
In the dialog box you will get preview of the picture so you can see effect your changes are having on picture.
Adjust given parameters untill you are satisfied with the results. Click OK. Save the file.
Start by opening the desired picture.
1. (Note the change we will make to example picture:)

2. After you open the picture, from the toolbox select crop tool, and then in tool options bar type dimensions. Mark the picture, and then make sure the edges of the marker match edges of the picture. Then press Enter:

3. Select option Image/Adjustments/Levels, and you will get this window:

by moving one of three triangles, you adjust shadows, brighter, and darker tones..

when you are satisfied with values (in my case, input level values are: 18, 1.30, 232) click OK and save the picture.
4. You can also adjust auto contrast authomaticly, by using option Image/Adjustment/Auto Contrast. In this example, we wont use that.
5. Change the colors on Picture. Select rectangular marquee tool and select desired area. Select option Image/Adjustments/Replace Color.


Select the first dropper tool, and click on any point on the color you want to replace. Now, click on middle eyedropper tool, and draw across other areas of the desired color, untill the whole selection in dialogue becomes white.

Adjust tolerance level to 80. By this, you adjust degree by which the connected colours will be included in mask. Click OK
6. Adjusting the light using dodge tool. Select dodge tool from toolbox. Input parameters as you wish. You have brush thickness, Range, and exposure.

Draw across desired object (curtains in this case), to sharpen them

7. Adjusting clearance by selecting sponge tool (behind dodge tool).

draw back and forth to brighten and make the color more clear.
8. We will end this lesson by using Unsharp Mask filter, that creates the ilusion of more focused picture. Select it from Filter/Sharpen/Unsharp mask.

In the dialog box you will get preview of the picture so you can see effect your changes are having on picture.
Adjust given parameters untill you are satisfied with the results. Click OK. Save the file.
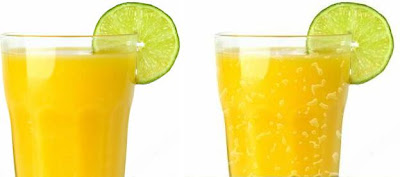
- Photoshop - Adding Watter Drops to Glass
Easy way to add watter drops to surfaces. In this case - glass of juice...
It might seem a little hard, but it really is not... Here's how it's done...
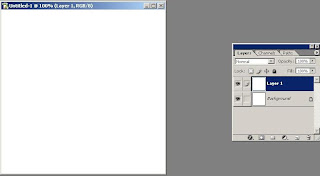
1. Start by making new surface, and then make new layer. Color this layer into white (by clicking on it in layer panel, and pressing Alt+Backspace, if white is your secondary color). Here's what you should get:
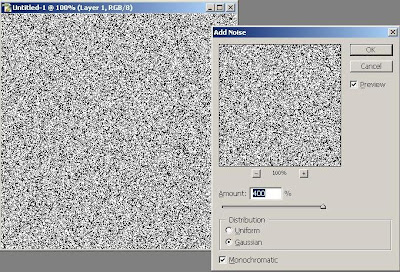
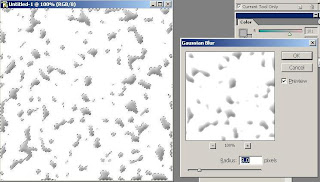
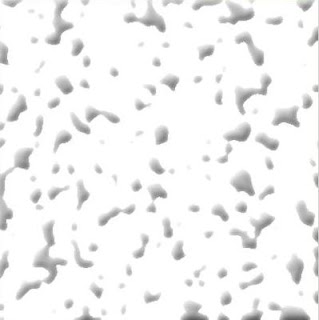
2. After that, from menu bar select "Noise -> Add Noise", and add maximum amount of noise (400%). Use picture bellow to see if you are doing it right...
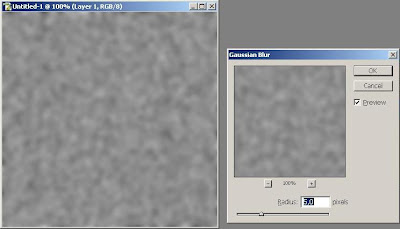
3. Now, you should go to "Effect -> Blur -> Gaussian Blur", and adjust radius to approx 5.
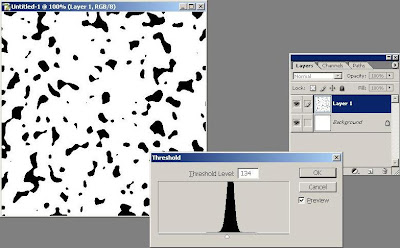
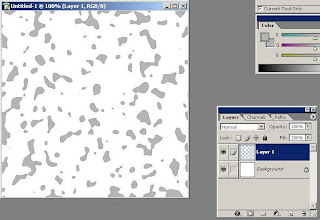
4. Now go to "Image -> Adjustment -> Treshold", and draw the pointer until you get somewhat of black drops on your picture.
5. Use "Magic Wand" tool to select white background of the picture, and then press Delete to delete white background. Now, press Shift+Ctrl+I to invert selection.
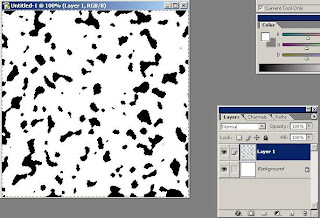
6. Now, by selecting one shade of gray in color box, press Alt+Backspace to color the drops...
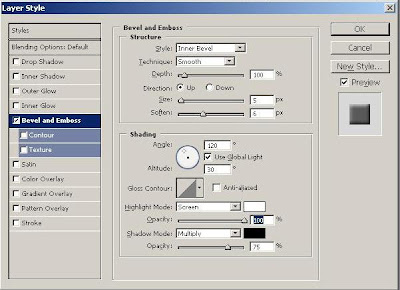
7. Deselect the selection (with Ctrl+D). Now, go to "Layer -> Layer Style -> Bevel and Emboss", and then input values as shown on picture (or improvise around them):
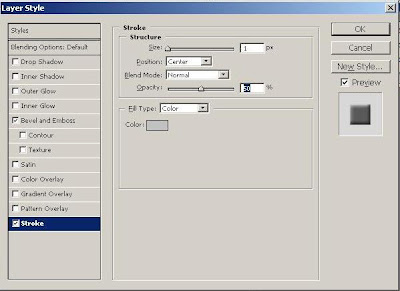
8. Now, go to "Layer -> Layer Style -> Stroke", and also input values as follows, or something around them...
9. Again, select drops by selecting the drops Layer, and pressing Ctrl+E, to make two layer into one. Now,
10. At the end, your water drops sample should look something like this:
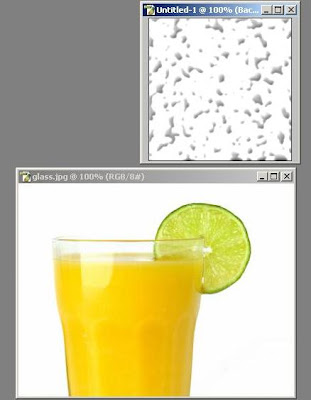
11. Now, open the picture on which you want to add water drops (in this case it is glass of juice), and, if it is needed (if drops sample is too big for the picture) resize the water drops image to fit the glass.
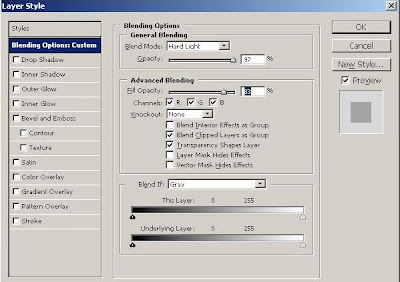
12. Now, drag and drop the "Water Drops Layer" to your "Glass picture", and then go to Blending options of the layer, and set the values as follows (note that blend mode is set to Hard Light!):
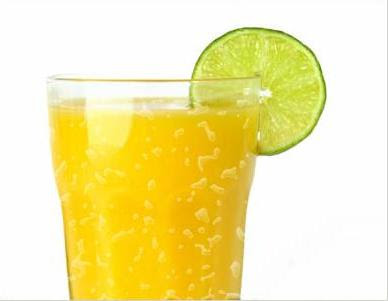
13. When finished, after maybe few adjustments of the position of drops, i got my wet glass of juice!
That is it!

It might seem a little hard, but it really is not... Here's how it's done...
1. Start by making new surface, and then make new layer. Color this layer into white (by clicking on it in layer panel, and pressing Alt+Backspace, if white is your secondary color). Here's what you should get:

2. After that, from menu bar select "Noise -> Add Noise", and add maximum amount of noise (400%). Use picture bellow to see if you are doing it right...

3. Now, you should go to "Effect -> Blur -> Gaussian Blur", and adjust radius to approx 5.

4. Now go to "Image -> Adjustment -> Treshold", and draw the pointer until you get somewhat of black drops on your picture.

5. Use "Magic Wand" tool to select white background of the picture, and then press Delete to delete white background. Now, press Shift+Ctrl+I to invert selection.

6. Now, by selecting one shade of gray in color box, press Alt+Backspace to color the drops...

7. Deselect the selection (with Ctrl+D). Now, go to "Layer -> Layer Style -> Bevel and Emboss", and then input values as shown on picture (or improvise around them):

8. Now, go to "Layer -> Layer Style -> Stroke", and also input values as follows, or something around them...

9. Again, select drops by selecting the drops Layer, and pressing Ctrl+E, to make two layer into one. Now,

10. At the end, your water drops sample should look something like this:

11. Now, open the picture on which you want to add water drops (in this case it is glass of juice), and, if it is needed (if drops sample is too big for the picture) resize the water drops image to fit the glass.

12. Now, drag and drop the "Water Drops Layer" to your "Glass picture", and then go to Blending options of the layer, and set the values as follows (note that blend mode is set to Hard Light!):

13. When finished, after maybe few adjustments of the position of drops, i got my wet glass of juice!

That is it!
- Photoshop - Woodcut Look Technique
It's always fun to make your picture look like this. Woodcut is very common technique in Photoshop, but very effective one! Look what change to your picture you can make:
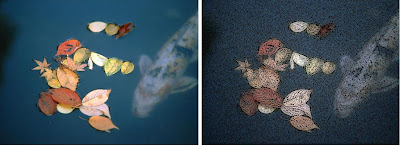
Let's see how it is done...
1. Start with opening your picture, and duplicating layer...
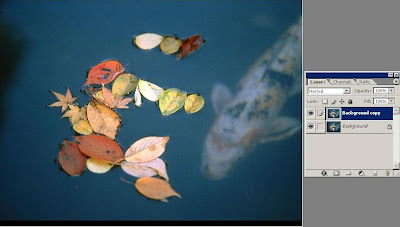
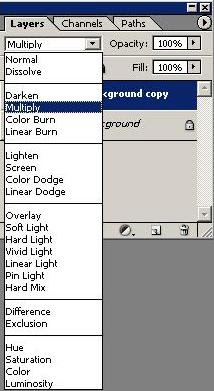
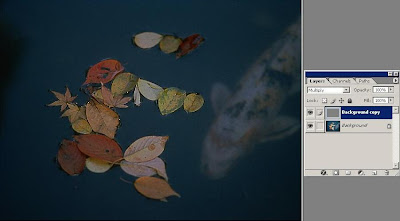
2. Select the copy of the layer, and then go to layers menu, and set Blend mode from Normal to Multiply:
3. Filter the layer through "Filter -> Other -> High Pass", and set the Radius to 1.6, and click OK. Now, the "copy layer" is made into gray "woodcut" picture.
4. Go to "Image -> Adjustments -> Threshold", and leave the threshold to it's default value (128), and click OK. This step is the one that creates the woodcut look.
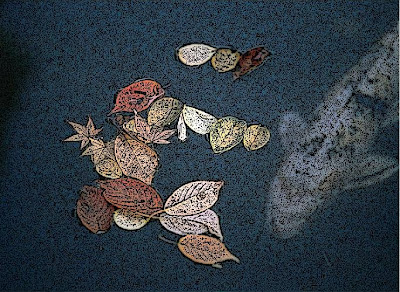
5. One additional thing you can do is to select the first layer "Background", and choose "Filter -> Blur -> Gaussian Blur", and select the radius 8 (or whichever you like, depending of the softness of image you want to achieve), and then you can see your final results:
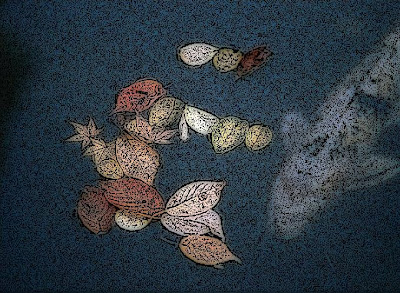
There it is! You have learned one more great trick in photoshop!

Let's see how it is done...
1. Start with opening your picture, and duplicating layer...

2. Select the copy of the layer, and then go to layers menu, and set Blend mode from Normal to Multiply:

3. Filter the layer through "Filter -> Other -> High Pass", and set the Radius to 1.6, and click OK. Now, the "copy layer" is made into gray "woodcut" picture.

4. Go to "Image -> Adjustments -> Threshold", and leave the threshold to it's default value (128), and click OK. This step is the one that creates the woodcut look.

5. One additional thing you can do is to select the first layer "Background", and choose "Filter -> Blur -> Gaussian Blur", and select the radius 8 (or whichever you like, depending of the softness of image you want to achieve), and then you can see your final results:

There it is! You have learned one more great trick in photoshop!
- Photoshop - Removing Acne with Photoshop
Nice video tutorial, teaching you basic techniques of retouching, through removing acne from example picture. Enjoy!
- Photoshop - Turning Photography into Drawing
This lesson will teach you how to, in easy way, make drawing from photography.
1. Open your photography.

2. Go to "Filter -> Stylize -> Find edges" in your menu bar.

3. Now, press Shift+Ctrl+U, to remove colors, and you'll get nice drawing from your picture!

Nice and easy!
1. Open your photography.

2. Go to "Filter -> Stylize -> Find edges" in your menu bar.

3. Now, press Shift+Ctrl+U, to remove colors, and you'll get nice drawing from your picture!

Nice and easy!
Subscribe to:
Posts (Atom)