Welcome

Welcome to video tutorials, a place which will provide you with simple and easy lessons concerning graphic design, photography, audio engineering, production, animation... Here, you can find tutorials on these subjects showing you how, in easy way, you can create what you want, with no trouble at all. There are new tutorials added every day! Hope you find these lessons useful!

Thursday, May 31, 2007

- Photoshop - Coloring Eye

Today, we'll show you how to make simple eye coloring in photoshop...


1. First, open picture of the eye. (it helps if picture is in black and white)


2. Open Contrast/Brightness dialogue, and play a bit with it till you get a filling it's ok. (in this case +10, +50)


3. Create new layer, and click the "Eliptic Marquee Tool", and make it the same size as iris of the eye. Click "Select->Modify->Expand->2-3px", then click "Select->Feather->2-3px", and then fill the circle with any color.


4. Set the layer to Overlay.
Then Bright up the "Image->Adjustments->Hue/Saturation" tool and then click colorise, and play with it till you get nice look.


5. Hold down CTRL and click the layer with color on it to select the outline. Then click "slect->inverse" and create new layer. Then on that new layer select "Soft Light" as mode.

Fill the selected area with skin color.


6. Now merge all visible layers, then gaussian blur it at 6.7px, and the click "edit->fade gaussian blur->screen", and there you have it.
After maby doing some final retouching, you'll have these results:


That is about it.
Hope you enjoyed it.

- Macromedia Flash - Sound Slider in Flash

Creating Volume slider for media player quickly and easily! Have fun!

- Macromedia Flash - Basics of Buttons

Learn all about the basics of buttons in Flash and make cool navigation bar with your new skills. Have fun!


- Maya - Basic Blend Shapes controls

Video tutorial that explain how to make a basic controls for your blendshapes (like a slider).


- Maya - 3D animation tutorial

Maya 3D animation software tutorial on rigging a piston using constraints

Wednesday, May 30, 2007

- Photoshop - Creating Matrix Effect

Today, we'll show you another photoshop trick. How to make the matrix effect.
I hope you all watched movie matrix, or at least will recognize what matrix effect is after looking pictures below...


1. Let's Start by creating new 200x200 pix picture.


2. Press 'D' to restore background colors.


3. Now, create the new layer. (you can do this by hitting Shift+Ctrl+N)


4. Go to "Filter->Texture->Grain" (from main menu bar), and apply settings as follow:


5. Next, add some neon glow, by going to "Filter->Artistic->Neon Glow" (from main menu bar), and apply these settings:


6. Now go to "Filter->Brush Strokes->Accented Edges", and apply settings:


7. Click OK, and there you have it. Matrix effects picture.


I hope you liked it!

Tuesday, May 29, 2007

- Audacity - Mixing

OK. Audacity is great open source program for those who can not afford Sound Forge, and similar software...
In this lesson, learn how to extract audio clips from a longer recording and mix them back into a new music track... All that in Audacity. Enjoy!

- Photoshop - Creating Smoke Effect

An easy trick to make smoke effect...

1. First, make a picture with only black background. In my case, 150x200 pix.


2. With your brush tool draw a straight white line. (Note that opacity and flow are set to 100%)


3. Now, use the smudge tool to distort the line. I used 50% strength smudge tool.


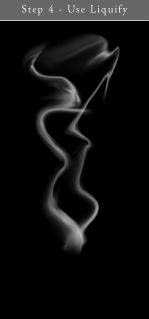
4. Now, from your menu bar use Filter -> Liquify. You can also duplicate this layer, and reshape it.. In the end, by using Edit -> Free transform gather all layers up. Now make a new empty layer just above the background layer. Set the background layer on invisible, and select the others. In the layer opacity select Merge Visible. This will Merge everything that is visible on the layers, but will not flatten the image.


5. (additional) You can also play with Filter -> Noise -> Add Noise option from your menu bar, and shape the smoke the way you want it.


That's it! Try it, and have fun!

Saturday, May 26, 2007

- Sound Forge - Making Audio Loops

This tutorial, based in Sound Forge, will show you how to first rip off audio CD, and then how to make loops with the result.

- Sound Forge - Basic Effects

This tutorial will show you some very basics in adding effects to track:


1. First, open track you want to add effects to:


2. Second, select portion of the track you want to add effect to:


3. Third, go to Effects section in menu bar, and select desired effect. In my case, i will select Reverb:


You shold get this window:


4. Fourth, select options for your reverb. You can select one of many preset modes for you reverb, or set parametars manually. Once you've done, click OK. The track should now look like this:


Note that part of the track we selected is now reverbed. You can, of course, select whole track to add effect to it.
As you've seen, it is very simple, and it is the same for any effect in menu.

- Cubase - Adding Virtual Instruments

This tutorial will help you use virtual instruments in Cubase. Also, topics covered are Audio and MIDI tracks...

Friday, May 25, 2007

- 3D Studio Max - Basic Modeling

In this lesson you will learn some very basics of modeling in 3D studio max - starting on types of modeling, and then going to some examples with spheres modeling.


- Photoshop - Animated Layers

This tutorial will show you basics of Layers animation in Photoshop.